clearString neatComponents
| |
|
clearString neatComponents Record Links - an example |
| How-to Resources | ||
Record Links - an example | ||
Record Links - an example
Note:
The illustrations and component references on this page refer to an older version of neatComponents. We are in the process of updating the documentation.
The functionality and results are the same.
Using Record Link fields – an example
This example shows how to use a Recordlink field
How to use this example:
Download the example site, and use this documentation to understand how it was constructed before adapting it for your own needs.
- or -
Start with a blank site, and follow the documentation to replicate the example site yourself.
Download the blank site (This is also normally already available on your server as the 'blank site' template)
Useful tip: If you are starting with a blank site, first off add all the components, without configuring them. Then go back, and add in the configuration. This helps because sometimes you need to link components to other ones which appear later in the sequence, and if you haven't yet added them, you can't link to them.
Why use a Record Link Field?
For our example, we want to store the name of a State – "New York", "California", etc. in a Form record.
The first thing is to choose what datatype to use.
One of the simplest is the Text datatype. A field of this type can contain any short text string. However people are often unreliable about typing in names, and if we want to be able to arrange the records by State later on, we need to ensure they are all correctly spelt.
One way to achieve this is to use a Drop Down List datatype. With this, the user is presented with a dropdown, and they choose from that. There is no opportunity for error. The list of States is entered in the field properties dialog, and no further setup is required. However, with simplicity come restrictions: you can't associate any other information with each State name, and you are limited in the ways you can query them.
The solution is to use the Record Link datatype. To the user this appears like a Drop Down List field, however the difference is where the information is stored. The Record Link gets its list of names from another Form. The list of names shown in its dropdown is the Navigation Field specified in the other Form.
By using a Record Link you gain several advantages:
- The information in the list can be entered by other users, without deep admin permissions.
- You can manage very long lists easier: hundreds, or even thousands of entries are possible. (When the list gets to large to show in a drop down, it automatically switches to a search mechanism)
- The information can be queried in richer ways: sorted by name, or by any of the other fields in the linked Form
- Forms can be cascaded together to allow rapid selection of information (eg selecting a Country first, and then from a list of States within that country)
A simple example
This example provides a Recordlink field which will show a list of States.
First we need to create the Form containing the States.
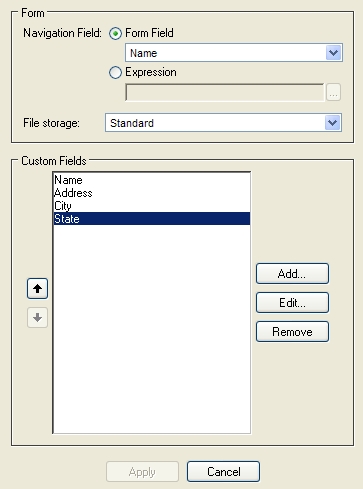
- Add a Form to the site, and call it "F: State"
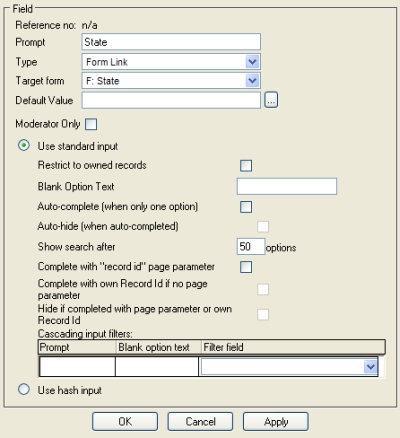
- From the Toolbox, choose Configure Form, and on the Form Fields tab:
- In the Custom Fields section, add a field, type Text, and call it 'Name'
- In the Form section, set the Navigation Field to the 'Name' field
- Click Update
The configuration should look like this:

Now we need to populate the Form with the names of the States
- From the Toolbox, choose View Form
- Click the link 'Click here to submit a new record'
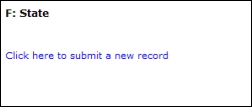
- Enter a State name, and Click 'Submit Form'
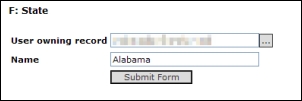
You are then shown a confirmation of the entry. To enter another record, choose View Form from the Toolbox.
Note: To speed entry, you can skip this screen: In The Behavior Editor / Settings / Options / Redirect target after record update, click [...] and select Local Relative Page / Current Page
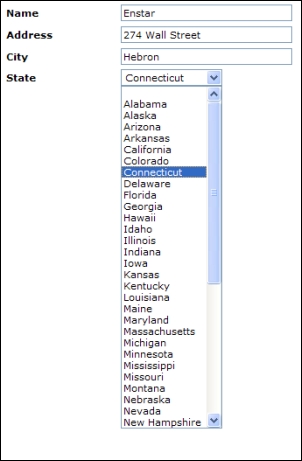
When done, the form should show them all:
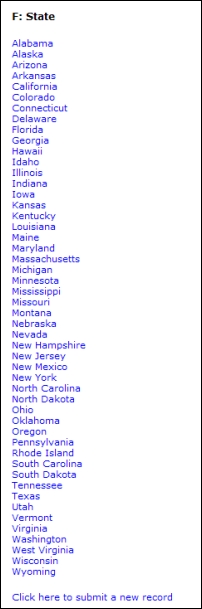
Note: if instead of names, you see a list of numbers, that means the Navigation Field was not set to the Name field – see configuration instruction above. It's not too late to correct this.
Now we have our list of States, we can use it in a Record Link field on another Form.
For this example we will create a Form called 'F: Contact' and we will use the Record Link as part of a set of name and address fields:
- Add a Form to the site, called 'F: Contact'
- Form the Toolbox, choose Configure Form, and on the Form Fields tab:
- Add a Field of type Text, called 'Name'
- Add a Field of type Text, called 'Address'
- Add a Field of type Text, called 'City'
- Add a Field of type Record Link, called 'State'
- Set the 'Target form' to 'F: State'
- In the Form section, set the Navigation Field to the 'Name' field
- Click Update
To test the Contact form, from the toolbox, close View Form, and click 'click here to submit a new record'
The State field is shown as a drop down, populated with the list of States. (They will be shown in alphabetical order, even if you didn't enter them that way)
A long dropdown is unwieldy. The Recordlink field's properties allows you to set the threshold, above which the dropdown will be replaced with a search mechanism. This settings is the 'Show search after [50] options' (see illustration in 'F: State' above). So this value is changed from 50 to 25, the State field looks like this:
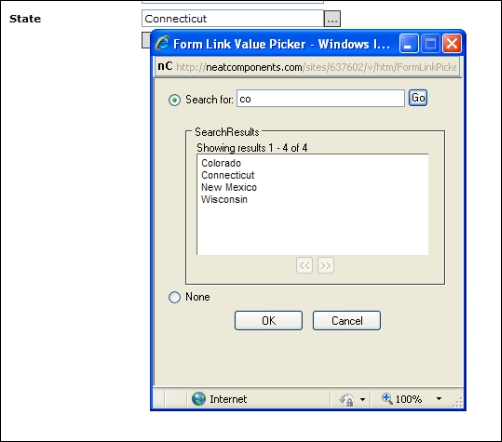
The user clicks the [...] button, and is shown a dialog where they can type in a few letters from the entry. In this example the user entered 'co', and clicked 'Go'. This then showed all the entries containing that fragment. The user then clicks the desired option, and OK.
Copyright © 2026 Enstar Systems Inc. All rights reserved |