 |
clearString neatComponents
|
|
clearString neatComponents Dividing appearance from content with Layout Elements |
 | ||
 | Application Development |  |
Dividing appearance from content with Layout Elements | ||
 |  |
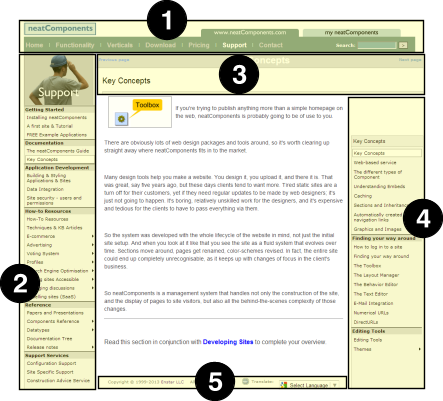
Each 'page' on a neatComponents web site consists of two parts: Body and Layout Elements

- Body provides a surface that contains the variable content, shown in the white-space above - either unstructured data such as text and images, or Embeds from form-based structured content.
- Layout Elements (numbered 1 to 5 above) contain the repeating content - navigation, banner headings, etc that show on all pages.
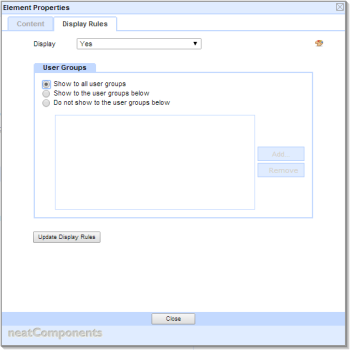
Display Rules
Each Layout Element has an associated option controlling when it is displayed.

This allows different layout elements to be shown to members of different Usergroups.
This feature can be powerfully combined with the ability to automatically move users into Usergroups depending on a number of criteria:
Domain
IP Address
User Agent
This makes it simple to provide automatic transfer to Mobile versions, or alternate language versions, or intranet-access controls.
Read more in the Usergroup Manager...
Layout Elements explained
Layout Elements either 'surround' the components (pages, sections, etc) in the website, and so scroll with the page, or they can be Fixed, in which case they remain visible on the screen in the same place regardless of how much the page is scrolled.
Each webpage - in fact, each Component - has Layout Elements associated with it. They are positioned above, below, to the left and to the right of the page, or can be set to be fixed on the viewport 'floating' over the page when it scrolls.
There is no limit to how many Layout Elements there may be for any particular page.
The Behavior Editor for each page controls whether or not a Layout Element is used on a section-by-section, or page-by-page basis.
Scrolling with the page
To set a Layout Element to be positioned scrolling with the page:
- Add or Edit the Layout Element
- Open the Position tab
- Select 'Scroll with page positioned by layout"
- Select the edge from the dropdown

Each Layout Element extends the full width (Top and Bottom Layout Element) or full height (Left and Right Layout Element) of the space available.
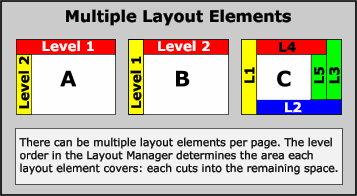
The sequence of the Layout Elements is important in determining how they are displyed on the page. The illustration below shows the difference between applying a Top Layout Element before a Left (Example A), or a Left before a Top Layout Element (Example B).
Creating a Layout Element 'cuts into' the remaining space on a page, as seen in
Example C.


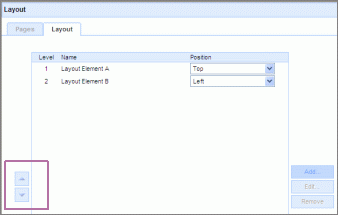
It is possible to change the sequence of Levels in the Layout Manager, by using the up/down arrows in the Levels Control.
You use this same routine to create a new level of Layout Elements and designate its position on the webpage.
You can have multiple Layout Elements of the same type - in the top example there are three different sets of navigation - a layout element at the top of the page providing side navigation. Then two separate layout elements to provide navigation depending on the location and the depth of the parent section, to provide context appropriate navigation controls to the user.
Fixed on the viewport
The 'viewport' defined.
The 'viewport' is the rectangle of screen that the browser uses to show a webpage, or part of a webpage. If the web page is larger than the viewport then the page can be scrolled to bring different parts of the webpage in to view in the viewport.
When a Layout Element is fixed on the viewport, the page can be scrolled 'behind' the Layout Element, but the Layout Element itself does not move, but appear to float over it.
To set a Layout Element to be positioned fixed on the viewport:
- Add or Edit the Layout Element
- Open the Position tab
- Select 'Fixed on the viewport"
- Define the position of the Layout Element:
- Click on the grid to select a point of the Layout Element
- Enter any offset values, either in px or %
- Click on the grid to select which point on the viewport this should be relative to.
Surround
Compare Layout Elements, which are site/app wide to the Surround component that can be called into use by a Query Embed to provide more flexible framing and paging controls around the displayed result set.
Copyright © 2026 Enstar LLC All rights reserved |
