clearString neatComponents
| |
|
clearString neatComponents Query by Example |
| Application Development | ||
Query by Example | ||
Configuring a Query by Example
Without some mechanism to restrict the results displayed to those that you want the information displayed is not very useful.
The Query by Example (QBE) provides that mechanism by giving you a dynamic display control, so you can restrict the result set to, from our example, only Government contacts - or whatever.
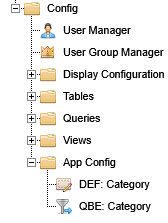
To get started you need to add a Query by Example to the Config section, and call it QBE: Category
Having added the QBE, right-click and open in a new tab to configure it.
Open the Text Surface, and add a Field embed, and then edit it to configure the General tab options.
You must give it a unique Parameter name - starting with a lowercase letter. It is helpful to give it a context appropriate name. We are using picker.
.png)
We are going to want to have a Check Box List as the way to select records. Next, set the Allowed values to be set to the Table Category previously created, with the Value set to Record Id and the Text to Category Name.
.png)
Then add a Submit Button to the Text Surface, and give it some Button text 'Submit', and save.
When you are done, the QBE Text Surface will look like this:
.png)
Now we can go to the public pages and embed the necessary components so that the results will come to view on demand.
Go to the 'First Page in Section 4', and Edit the page.
Embed the 'Query By Example'.
And then below it, embed the Query Q: Category View with the Output set to CV: Category View.
.png)
Edit the properties of the QBE and ensure it is set to use the correct Query and to Trigger on Form Submit.
.png)
Next, edit the properties of Query you embedded, set to use the CV Category View.
Records tab
In the Records tab, set the Criteria to Restrict All Records on Field Category Id, where the Operator is Equal to the Value of a Parameter Parent with an explicit value of picker (the name we gave the QBE Parameter name previously).
.png)
Ajax tab
Then move to the Ajax tab.
Ajax enables the content to react on record selection without reloading the whole page.
.png)
Uncheck the box Show Initial Content, so that no results are shown until the Submit button is clicked.
Check the box React to transitions - this sets the 'listen' control. If you had multiple instances on the same page you can set a matching channel to listen to react on.
The Cache transition content is checked by default. This saves the query roundtripping the server on repeated queries. The cache resets when the user leaves the page.
Loading Indicators
In a live system, with many records, a search query may take some seconds to arrive. So that the user gets some immediate feedback the platform will provide a Loading Indicator or Throbber by default. You can use the default throbber, or not use one at all, or specify your own by selecting the Component button. In this usage you would embed your custom graphic (animated GIF) on a Page component, name the Page something sensible - Loading.Indicator and then call that Page.
Display Space
You need to ensure that there is space for the throbber to display. This is set on a per embed basis. You will recall that the same Custom View could be used in multiple places in an app, so the height is set not in the CV itself, but in the Embed dialog, so that different instances can be controlled separately.
Go to the 'First Page in Section 4', and Edit the page, if you are not still on that Page, and Edit the Custom View embed.
.png)
In the Components tab, go to the Style section, and click the [...] button.
The Style Editor will open.
Select the Style for the Embed and select the Layout tab.
In the Layout tab, set the minimum height to be, for example, 200 px.
.png)
Then Save Changes, and Save back to the Page.
You will notice that the Style dialog in the CV editor is now marked 'configured'. This provides you with an indication that a control has been set in the accompanying dialog, and can be useful in troubleshooting unexpected behavior.
End Results
Now when you return as a Visitor to the 'First Page in Section 4' you should see something like this:
.png)
If you check the box Government and click Submit the page should show you all records where the category was Government.
Like this:
.png)
Now try going back to the Email Form in Section 2 and adding a few more records, one at a time, making sure that you complete all fields. Make sure you create at least a couple for each category.
Now experiment with the checkboxes to see how the search works.
No Records Surface
You may notice that if you select a Category for which there are no entries, say Home or Business before you add any additional records, instead of results you get blank space. It would be nicer if the user got a message 'No records match your chosen criteria'.
The No Records Surface content is set in the configuration of the CV: Category.View
.png)
It is useful to configure this content so that the app user knows why no results are returned, and are not just confronted with a blank page.
Validation
But why didn't you see any results for the Home or Business category for the initial records?
When we set up this Tutorial example the Category field deliberately did not exist when we created the initial records. We added it in later; so the initial records don't exist. As the app admin you can go back and edit those records and add in the Category and Save the record. Now they will show up in the results.
They didn't show up because the Join in the Query Q: Category View was set in the Join Properties Matching section to Require
.png)
You will also have noticed that in our instructions above for adding additional records you were told to make sure all fields were completed. You cannot rely on your app users to correctly complete all fields of a form, so Data Entry Forms have a system that makes sure an entry is present if it is required: Validation.
When you were constructing the Data Entry Form for the Email Form on Section 2, for each field that you embedded on the Text Surface there was a Validation tab:
.png)
In this case, Pre-submission Validation should be set for each field to ensure it is completed with an appropriate entry. As well as simple present or absence of data you can also perform Regular Expression tests on the data submitted, as well as simple checks looking for Contains @ in an email address, and so forth.
An Error Surface is provided to give feedback to the User as to what went wrong.
Validation is explained in detail here...
![]() NEXT - on to Full Stack - Design hints
NEXT - on to Full Stack - Design hints
Below the line
Loading Indicators
You can read more about the Ajax tab here...
You will notice that one option in the custom Loading Indicator dialog is to use Parameter or Query Field. These options give you fine grain control over which of many custom throbbers you may have created. An example usage would be to use a Query looking at the Logged On User so that your throbber can be personalized to that user. For example if you were creating a Booking System, your Loading Indicator could say 'Thank you, Susan, for your order we are processing it now'.
Creating your first app In this section |
|
Creating your first app
We learn how to configure a Query by Example to restrict the results displayed. In this section: |
|
 What are we learning here?
Copyright © 2026 Enstar Systems Inc. All rights reserved |