 |
clearString neatComponents
|
|
clearString neatComponents Customising the login forms |
 | ||
 | Application Development |  |
Customising the login forms | ||
 |  |
The default behaviour described in Managing profile forms for users, which shows all the fields from the profile tables, is often not what you need, as there are many scenarios where you need to have some profile fields visible to the user, while others are hidden for administrators to maintain.
In these cases you need to define some custom surfaces for the login component, and then switch the login component to use them.
The custom surfaces can also be used even when you don’t want to use extra fields, but just want finer control over the layout of the login forms.
Method
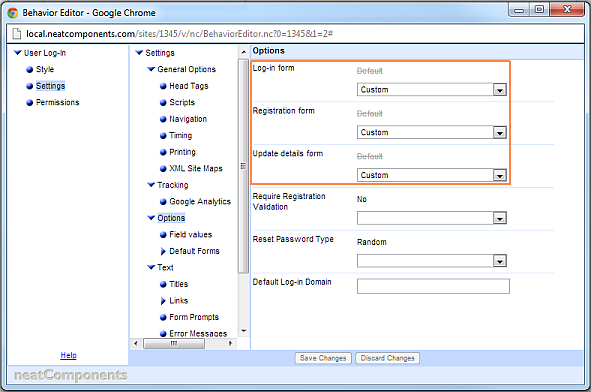
On the Login component / Behavior Editor / Settings / Options, set the “Log-in form”, “Registration form” and “Update details form” to Custom. This will switch the system to use the custom surfaces we are about to define.
Note: You don’t need to switch all the forms over, but it would be unusual to only do some.

Still on the login component, go to Toolbox / Configure Log-in.
The Configuration tab should show the profile table specified earlier. (If it is blank, follow the Managing profile forms for users - Method section to create and link in your profile table here)
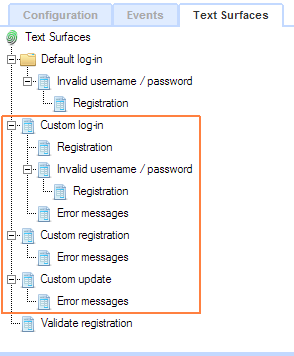
Now go to the “Text surfaces” tab. This shows a tree of all the surfaces available for us to configure. At first glance this seems a complex list, but it is actually straightforward:
Below the “Default Log-in” section, which we can ignore, there are three sections we need to configure:
- “Custom log-in” defines the form people see when they attempt to login.
- “Custom registration” defines the form people see when they click on a registration link, which allows them to create themselves as a user on the site.
- “Custom update” defines the form people see when they change their details.

Each of these has one or more sub-surfaces, typically to define how error messages should be displayed. The sub-surfaces can be embedded in the parent surfaces where you want them to appear.
Note: when designing and testing these surfaces use two different browsers (for example Chrome and FireFox), as this enables you to be logged in as an administrator on one, whilst logging in and out to test on the other.
Note: if you make a mistake, for example by not including the fundamental username and password fields on the “Custom log-in” surface, the system will protect your ability to login and recover the situation, by displaying these fields anyway (it might not look as pretty as you want, but it will allow you to login and fix the problem)
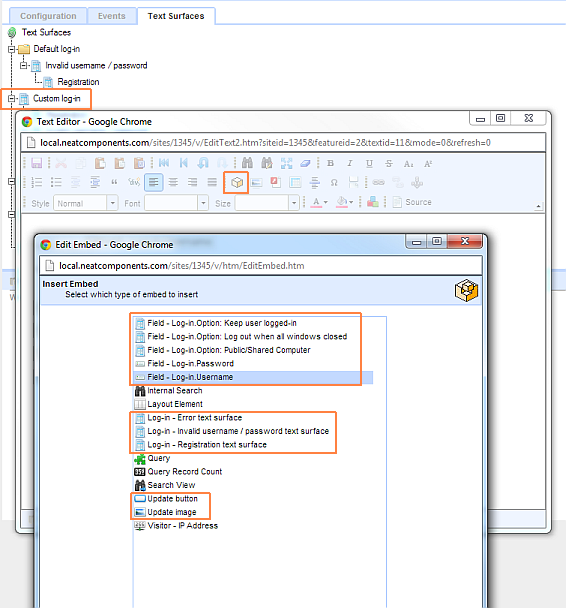
On the tree of surfaces, right-click on each of the surfaces to open them in an editor. You can then insert any layout and formatting you like. Use the Embed dialog to insert the fields you need: both fields from the login system and fields from the profile table.
Note: you may choose to show just a few of the profile fields on the “Custom registration” surface, and show more of them on the “Custom update” surface. That way user will benefit from a simple registration process, while having more control when they update their details.
Specific information about the custom surfaces
Custom log-in
This surface is shown to people when they attempt to log-in.

The following special embeds are available:
- Field – Log-in.Username
- Field – Log-in.Password
- Field – Log-in.Option: Keep user logged-in
- Field – Log-in.Option: Log out when all windows closed
- Field – Log-in.Option: Public/Shared Computer
- These three provide radio button choices that determine how long the cookies that remember a user is logged in will persist.
- These three provide radio button choices that determine how long the cookies that remember a user is logged in will persist.
- Log-in – Error text surface
- If there are any errors logging in, they will be shown if you include this embed, and define the Error Messages sub-surface
- If there are any errors logging in, they will be shown if you include this embed, and define the Error Messages sub-surface
- Log-in – Invalid username / password text surface
- Log-in – Registration text surface
- If registration is permitted, you can include the embed, and define on that surface a link to the registration form (ie use the Link Picker to choose “Local Page, User Log-in (register mode)”)
- If registration is permitted, you can include the embed, and define on that surface a link to the registration form (ie use the Link Picker to choose “Local Page, User Log-in (register mode)”)
- Update button
- This provides a button, with text of your choice, which when clicked on submits the form.
- This provides a button, with text of your choice, which when clicked on submits the form.
- Update image
- As an alternative to a button, you can use this embed to define an image which when clicked on submits the form.
Custom Registration
This surface is shown to people registering to become users on the site.
- Field – Log-in.Username
- The username the user wishes to have. Normally their email address
- The username the user wishes to have. Normally their email address
- Field – Log-in.Password
- Field – Log-in.Confirm password
- The password the user wishes to have, with a second field so they can enter it again to protect against typos
- The password the user wishes to have, with a second field so they can enter it again to protect against typos
- Field – Log-in.Title
- Field – Log-in.First name
- Field – Log-in.Last name
- Field – Log-in.Company
- Field – Log-in.Position
- Field – Log-in.Address 1
- Field – Log-in.Address 2
- Field – Log-in.City / town
- Field – Log-in.Region / province / county
- Field – Log-in.Zip code / post code
- Field – Log-in.Country
- Field – Log-in.Telephone
- The above fields are for their contact details
- The above fields are for their contact details
- Field – Log-in.Access code
- This allows discretionary membership of usergroups. Learn more about access codes
- This allows discretionary membership of usergroups. Learn more about access codes
- Field – Log-in.Option: Keep user logged-in
- Field – Log-in.Option: Log out when all windows closed
- Field – Log-in.Option: Public/Shared Computer
- These three provide radio button choices that determine how long the cookies that remember a user is logged in will persist.
- These three provide radio button choices that determine how long the cookies that remember a user is logged in will persist.
- Field – Log-in.Receive emails
- Allow the user to indicate if they want to receive emails. The system does not enforce this, but stores the field for you to query against.
- Allow the user to indicate if they want to receive emails. The system does not enforce this, but stores the field for you to query against.
- Field – {table name}.{field name}
- There will be a separate embed listed for each field in the tables configured for use with the login component. You do not need to use them all. Default values will be used for any not embedded.
- There will be a separate embed listed for each field in the tables configured for use with the login component. You do not need to use them all. Default values will be used for any not embedded.
- Log-in – Error text surface
- If there are any errors registering, they will be shown if you include this embed, and define the Error Messages sub-surface
- If there are any errors registering, they will be shown if you include this embed, and define the Error Messages sub-surface
- Update button
- This provides a button, with text of your choice, which when clicked on submits the form.
- This provides a button, with text of your choice, which when clicked on submits the form.
- Update image
- As an alternative to a button, you can use this embed to define an image which when clicked on submits the form.
Custom Update
This surface is shown to users updating their existing details on the site.
This has the exact same special embeds as the Custom Registration surface - see above.
Copyright © 2026 Enstar LLC All rights reserved |
